 I have been very blessed with the opportunity to be featured this month on an established author's website for the holidays. I will be featured next week with a surprise dish. Go to http://blog.victoria-wells.com to check it out!
Thursday, December 18, 2008
Cheers!
I have been very blessed with the opportunity to be featured this month on an established author's website for the holidays. I will be featured next week with a surprise dish. Go to http://blog.victoria-wells.com to check it out!
Wednesday, December 10, 2008
Manicotti del Formaggio Tre (Three Cheese Manicotti) with Marinara and Bechamel Sauce
Christmas dish? Okay so I’m exaggerating but it does have nutmeg! I know, I know, you’re thinking, “What, nutmeg and cheese…three kinds of cheeses?!” It sounds very incompatible but I assure you, make it without the nutmeg and you’ll notice something is terribly missing! Italian cuisine is my favorite. It leaves this irresistibly comfy buzz in your tummy that puts you in a blissful drowsiness!
Preparation:
 In the meantime, heat the milk in a seperate pan until just about to boil (you'll know it by the bubbles. Be sure to stir the milk so it doesn't form a "skin").


 Lay each one in the pan side by side. Once they're all stuffed and in the pan, pour over the remaining sauce and top with extra parmesan and mozzerella cheese and pop in the oven at 350° for approximately 20 minutes.
 If you like, you can add the marinara sauce as your base.
 To make marinara:
So for this three cheese dish of tummy buzz, we need...you guessed it! Three types of cheeses! I like to use Mozzerella, Parmesan and Ricotta but you can switch them out for other cheeses like Swiss or Romano fresh or packaged.
Any combination of the above cheeses are awes0me when used with the manicotti and bechamel sauce. Bechamel sauce is a basic white sauce which can be altered by adding cream, stock, seasonings, cheeses or dry herbs to make a number of other sauces like Mornay (cheese), Soubise (onion), and Creme (cream) sauces. I have also included the instructions for a basic yet flavorful marinara sauce if you'd like to try it (it is a little lengthy) or you can just use store bought marinara (which is a whole lot quicker)!
Ingredients:
1 pkg. Manicotti shells
The filling:
1 beaten egg
1 beaten egg
1/2 cup Mozzerella Cheese
1/2 cup Parmesan Cheese
1/2 cup Ricotta Cheese
1 tsp. dried basil
1 tsp. dried oregano
1/2 tsp. garlic powder
1/2 tsp. onion powder
1 tsp. salt
1/8 tsp. nutmeg
1/8 tsp. freshly grated lemon zest
Bechamel sauce:
4 cups of milk
4 tbsp. flour
2 tsp. salt
5 tbsp. butter
1/2 tsp. nutmeg
Marinara sauce:
1/2 cup Extra virgin olive oil
2 small onions, finely chopped
2 garlic cloves, finely chopped
2 garlic cloves, finely chopped
2 stalks celery, finely chopped
2 carrots, peeled and finely chopped
1/2 teaspoon sea salt
2 stalks celery, finely chopped
2 carrots, peeled and finely chopped
1/2 teaspoon sea salt
1/2 teaspoon freshly ground black pepper
2 (32-ounce) cans crushed tomatoes
2 dried bay leaves
2 (32-ounce) cans crushed tomatoes
2 dried bay leaves
In this particular instance, I did not use Marinara, but let me tell you, it tastes awesome if you do use it so I
Preparation:
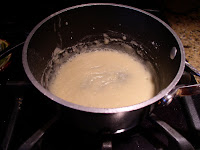
Bechamel
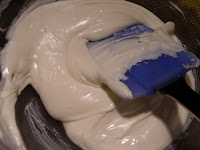
In a small sauce pan, heat butter over medium-low heat until melted. Add flour and stir until smooth. Cook until mixture turns a golden sandy color (about 7 minutes).
In the meantime, heat the milk in a seperate pan until just about to boil (you'll know it by the bubbles. Be sure to stir the milk so it doesn't form a "skin").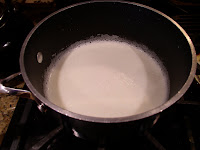
Once the milk is heated, add to butter mixture 1 cup at a time being sure to whisk continuously until milk is blended and consistency is smooth. Bring to a boil. Cook 10 minutes then remove from heat. Season with salt and nutmeg, then set aside until ready to use.
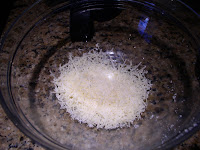
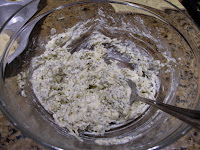
Now for the Filling!
In a small bowl, beat egg until yolk is consistent throughout. In a seperate bowl, mix remaining ingredients, then add beaten egg. Mix until well blended.
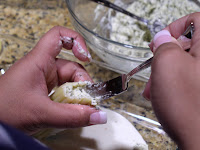
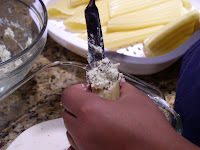
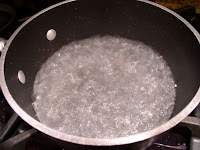
While you're making this, I recommend preparing the Manicotti shells as directed on the box minus two minutes cooking time. Now you will drain the Manicotti shells and stuff them one by one. I've laid out some of my sauce as a base in a pan for the shells to lay in.
 Stuff each shell with filling using a small spoon. I recommend a sugar spoon or even a small plastic baby spoon.
Now you will drain the Manicotti shells and stuff them one by one. I've laid out some of my sauce as a base in a pan for the shells to lay in.Stuff each shell with filling using a small spoon. I recommend a sugar spoon or even a small plastic baby spoon.Lay each one in the pan side by side. Once they're all stuffed and in the pan, pour over the remaining sauce and top with extra parmesan and mozzerella cheese and pop in the oven at 350° for approximately 20 minutes. If you like, you can add the marinara sauce as your base.To make marinara:In a large pot, (I recommend a stock pot if you have it) heat the oil over a medium-high heat. Add onions and garlic and saute until the onions are translucent. This should take about 10 minutes. Add celery, carrots and 1/2 tsp. salt and 1/2 tsp. pepper. Saute until all the vegetables are fork tender (another 10 minutes). Now, add tomatoes and bay leaves. Simmer uncovered over low heat for 1 hour or until the sauce thickens. Remove the bay leaf. Season the sauce with more salt and pepper, to taste.
You can make this ahead of time if you wish to. It is great for other pasta dishes throughout the week or as a dipping sauce for mozzerella sticks! MmMmMm!
Friday, December 5, 2008
A Chocolatey Christmas Treat!
Can we say in over my head with the recipes? UuUuUuhm…yes. But that’s okay! I have peppermint bark to save the day! I love this recipe any time of year. You can actually change out the topping and add your favorite nuts, trail mix, or ‘liqueur’. It’s awesome for parties and get-togethers and is normally the first thing to go. Trust me you’ll love it too!
Peppermint Bark
1 package of white chocolate (12 oz)
1 package of milk (you can have dark chocolate if you like) (12 oz)
1 tsp. peppermint extract (or your favorite liqueur)
Crushed Candy Canes (for topping)
Directions
In a double broiler (In my picture you’ll note a makeshift double broiler – my friend doesn’t have one), melt the milk chocolate until smooth. Now you’ll notice I have a mesh colander and a pirex bowl on top – gotta make it work…that’s all I gotta say. Please though, for safety reasons, please make sure you use a heatproof glass such as pirex or one that can be used in the oven.

 Pour the melted chocolate onto a cookie sheet lined with parchment paper. I highly recommend a cookie sheet, (not what I used LOL) one with low sides because once the chocolate sets, it will be very hard to retrieve your delicious little treat. Don’t worry about perfectly shaping the chocolate as later you will be breaking this ‘bark’ into pieces.
Once on the cookie sheet, place in the refridgerator to set the top slightly.
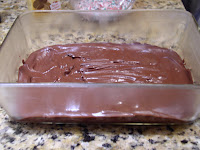 Next, we want to melt the white chocolate. Same method as above. You may want to wait to do this until the chocolate layer is set. (Note: it is good to wait until the top of the chocolate is set so that when you pour the heated white chocolate on top, it won’t run together).


 One thing to note, buy the round peppermint candies to crush instead of the actual canes. I had the canes to use but boy is it time consuming to unwrap them. Also I would suggest using a towel and a rolling pin for mess free crushing, otherwise, things other than your peppermints get broken (That story another day)!
That said, sprinkle the crushed peppermint over the top and pop in the fridge until set (I’d say about 2 good hours).

Peppermint Bark
1 package of white chocolate (12 oz)
1 package of milk (you can have dark chocolate if you like) (12 oz)
1 tsp. peppermint extract (or your favorite liqueur)
Crushed Candy Canes (for topping)
Directions
In a double broiler (In my picture you’ll note a makeshift double broiler – my friend doesn’t have one), melt the milk chocolate until smooth. Now you’ll notice I have a mesh colander and a pirex bowl on top – gotta make it work…that’s all I gotta say. Please though, for safety reasons, please make sure you use a heatproof glass such as pirex or one that can be used in the oven.
Pour the melted chocolate onto a cookie sheet lined with parchment paper. I highly recommend a cookie sheet, (not what I used LOL) one with low sides because once the chocolate sets, it will be very hard to retrieve your delicious little treat. Don’t worry about perfectly shaping the chocolate as later you will be breaking this ‘bark’ into pieces.Once on the cookie sheet, place in the refridgerator to set the top slightly.
Next, we want to melt the white chocolate. Same method as above. You may want to wait to do this until the chocolate layer is set. (Note: it is good to wait until the top of the chocolate is set so that when you pour the heated white chocolate on top, it won’t run together). And pour over milk chocolate once the milk chocolate has set.
MmMm…Okay, next we can crush the peppermint.
MmMm…Okay, next we can crush the peppermint.
One thing to note, buy the round peppermint candies to crush instead of the actual canes. I had the canes to use but boy is it time consuming to unwrap them. Also I would suggest using a towel and a rolling pin for mess free crushing, otherwise, things other than your peppermints get broken (That story another day)!That said, sprinkle the crushed peppermint over the top and pop in the fridge until set (I’d say about 2 good hours).
Okay – this is what it may come out looking like when you use a cookie sheet instead of a deep dish:
Monday, November 17, 2008
Taking a Short Break...
Ugh! So, I'm in the process of moving...times are hectic. I can't wait to get back in the kitchen and be up and running again. I have been back and forth to Barnes and Noble looking up every possible recipe I can type in my phone - lol - I know lame right? I can't believe I just said that on the internet! But, marvel at me when I bust out with lavish pictures of delectible treats, pies and tasty entrees! I'll hopefully have it in me after the big move. Oh where? I'm not going far, just about 20 miles south of where I live now. I'm really excited, I'll be closer to my family and my favorite "hole in the wall" restaurants. I'll be sure to let you know all about our sweet reunions (uh with the restaurant that is - lol)! I'll also be closer to my most favorite place to eat ever! It's a seafood restaurant on the bay called The Harbor House. They have awesome wines and an oyster bar that's to die for (well, if you like oysters I mean). So - Thanksgiving week it's on! Can't wait for it to get here cuz I'm ready to throw down!
Monday, October 6, 2008
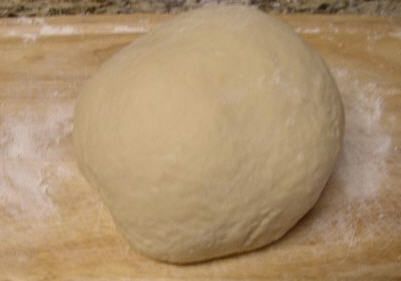
I found this awesome website about baking bread the other day. It's something I've always wanted to get into. Heck it saves a lot of money these days wiht food prices rising. It's an awesome little website with tutorials and explanations on how the ingredients of bread work together. I decided to try it yesterday. Boy I am so sore from kneading! It was the most rewarding experience. I love seeing the fruit of the labor of my hands! I'm starting to read more on Artisan Bread, and trying to incorporate it into my culinary repertoire. For those of you who are beginners, take a whole day and do this. It's lots of work but you'll love your finished product!
Home Made Sandwich Bread
2 cups all-purpose enriched unbleached flour
1 cup bread flour
1 teaspoon yeast
1 teaspoon salt
1/8 cup sugar
1 cup warm milk
2 tablespoons butter
1/4 - 1/2 cup lukewarm water
Mix the dry ingredients together, then mix in the wet ingredients, leaving out the water. You're going to mix and adjust the water (I recommend just using your hands or a wooden spoon) until you're able to form a ball with the dough. Place ball on a flat, floured surface (I don't recommend granite countertops as they are slippery. I would recommend maybe a baking stone or a wooden chopping board. Place a dish towel underneath to give it some "grip"). Knead dough for 10 minutes.
This is the fun part - but it will also make you sore! Kneading is simply squish and fold, squish and fold motion.
After kneading, form a ball with the dough and place in an oiled bowl, put a towel over it, and allow to rise for approximately 90 minutes. When you see your ball of dough again it should be doubled in size. The time frame for the yeast to work depends on the temperature in the room. The warmer it is, quicker it will rise. 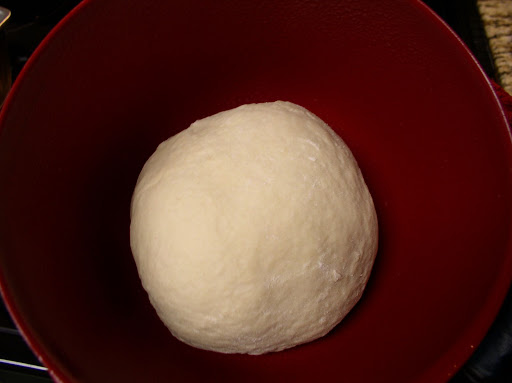
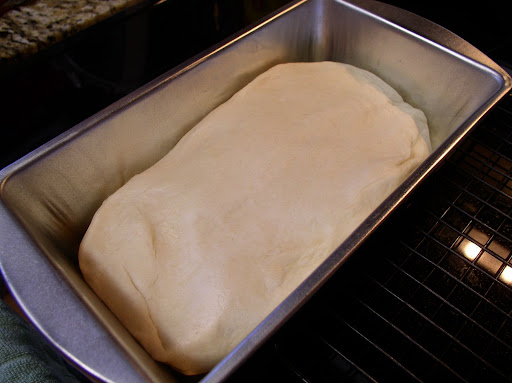
Once the dough has doubled in size, shape the dough, or put it into a pan and allow to rise for one more hour.
Bake at 350° for 40 to 45 minutes or until the bottom of the bread loaf springs back and your bread makes a hollow sound.
Allow to cool.
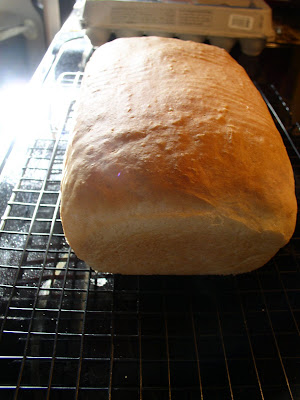
Store in an airtight plastic bag (zip loc does fine). This bread keeps for about a week!
Tuesday, September 23, 2008
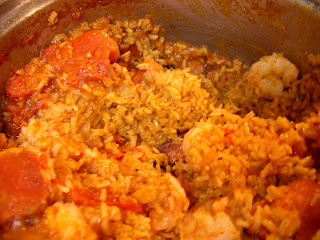
Louisiana Enchiladas
Sounds wierd right? Okay so I came up with this in kind of a spur of the moment type situation for my menu. The guy who ordered it was asking around to see if anyone had ever heard of it before. I figure, hey we put rice and meat in a mexican or spanish style dish so why not do it for cajun or creole dish? So this is how this dish was "born". You know I probably shouldn't say all this before I go and research to see if it has already been done but hey, I'm the Delightful Chef, what does it matter? Let's just enjoy the food shall we?
Alright, here goes...
Louisiana Enchiladas
1lb Spicy Sausage
2lb Shrimp (peeled and deveined)
2 Cloves minced garlic
1c. Onions, chopped
1c. Celery, chopped
1c. Green onions, chopped
2/3 c. Green Bell Peppers, chopped
2/3 c. fresh parsley, chopped
1 1/2 tsp Thyme
2 Bay leaves, crumbled
2 tbsp oregano
1 tsp chili powder
1 tbsp sage
1/2 tsp cayenne pepper
1tsp black pepper
1 tsp salt
2 c long grain rice
2 cans tomatoes (or 4 c. freshly stewed tomatoes)
2 c. chicken broth
1 can tomato paste (6 oz)
2 tbsp olive or vegetable oil
In a large pan (I would personally suggest a good seasoned large cast iron skillet - some people advise against it. I say, go with your gut, whatever you got around the house is fine!), saute garlic and onions in oil over medium heat, until soft. Add sausage and saute until just cooked remembering to scrape the bottom of the pan to get that goody goodness from the bottom. Add stewed tomatoes and tomato paste. Bring to a gentle simmer. Simmer for 10 minutes. Add remaining spices and herbs, and veggies along with rice and chicken broth. Mix just enough to distribute all ingredients evenly (about 3 swipes of the wooden spoon). Cover, lower heat and let cook (sit) at a gentle simmer until rice is done about 30 - 45 minutes (Do Not open the Lid!). Add shrimp, fluff rice just enought to evenly incorporate shrimp, cook another 15- 20 minutes (if using cooked shrimp, cook just enough to heat shrimp through) and VIOLA!
Let rest for 10 minutes and you now have Shrimp and Sausage Jambalaya!
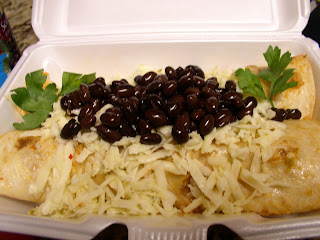
Preparing the Enchilada portion:
I took a 200 pan - whoops sorry - a deep baking pan (a cheap roasting pan maybe?) and spooned the Jambalaya over the pan, just enough to cover the bottom. I took a tortilla, rubbed it in the jambalaya (you can also do this after you add the tomatoes, spices and herbs in the original reciepe and just dip the tortilla in the jambalaya "sauce" if you will), spoon a small portion of the jambalaya into the tortilla and roll it up. Top with pepper jack cheese and black beans. Pop in the oven until cheese is melted, garnish with a couple spriggs of parsley and have at it!
Alright, here goes...
Louisiana Enchiladas
1lb Spicy Sausage
2lb Shrimp (peeled and deveined)
2 Cloves minced garlic
1c. Onions, chopped
1c. Celery, chopped
1c. Green onions, chopped
2/3 c. Green Bell Peppers, chopped
2/3 c. fresh parsley, chopped
1 1/2 tsp Thyme
2 Bay leaves, crumbled
2 tbsp oregano
1 tsp chili powder
1 tbsp sage
1/2 tsp cayenne pepper
1tsp black pepper
1 tsp salt
2 c long grain rice
2 cans tomatoes (or 4 c. freshly stewed tomatoes)
2 c. chicken broth
1 can tomato paste (6 oz)
2 tbsp olive or vegetable oil
In a large pan (I would personally suggest a good seasoned large cast iron skillet - some people advise against it. I say, go with your gut, whatever you got around the house is fine!), saute garlic and onions in oil over medium heat, until soft. Add sausage and saute until just cooked remembering to scrape the bottom of the pan to get that goody goodness from the bottom. Add stewed tomatoes and tomato paste. Bring to a gentle simmer. Simmer for 10 minutes. Add remaining spices and herbs, and veggies along with rice and chicken broth. Mix just enough to distribute all ingredients evenly (about 3 swipes of the wooden spoon). Cover, lower heat and let cook (sit) at a gentle simmer until rice is done about 30 - 45 minutes (Do Not open the Lid!). Add shrimp, fluff rice just enought to evenly incorporate shrimp, cook another 15- 20 minutes (if using cooked shrimp, cook just enough to heat shrimp through) and VIOLA!
Let rest for 10 minutes and you now have Shrimp and Sausage Jambalaya!
Preparing the Enchilada portion:
I took a 200 pan - whoops sorry - a deep baking pan (a cheap roasting pan maybe?) and spooned the Jambalaya over the pan, just enough to cover the bottom. I took a tortilla, rubbed it in the jambalaya (you can also do this after you add the tomatoes, spices and herbs in the original reciepe and just dip the tortilla in the jambalaya "sauce" if you will), spoon a small portion of the jambalaya into the tortilla and roll it up. Top with pepper jack cheese and black beans. Pop in the oven until cheese is melted, garnish with a couple spriggs of parsley and have at it!
Note: You may even set aside some of the sauce (tomatoes, herbs and spices, sausage drippings, etc), or make an extra batch to spoon over "enchiladas" before adding cheese and black beans.
Tuesday, September 9, 2008
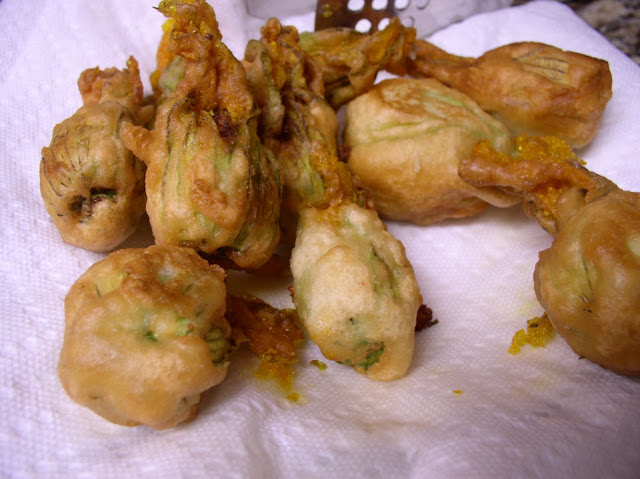
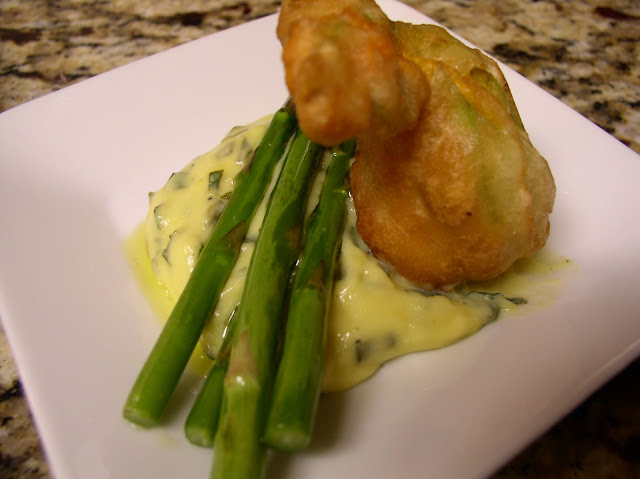
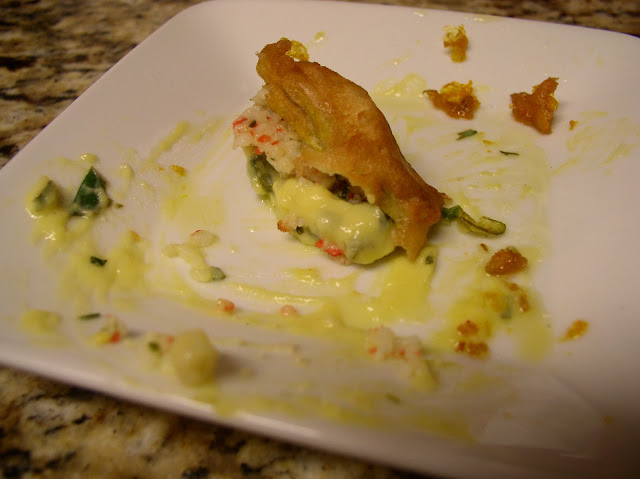
Crab Stuffed Squash Blossoms

Oh my! Have you ever tasted anything so awesome? I got this pearl of a recipe from San Diego Restaurants. San Diego's much praised Currant downtown serves this mouth-watering dish as one of their main appetizers. I would say, for my first time making this dish, it's definately a household keeper! These were awesome little morsels great for an afternoon snack! It sure is a lot of work. The labor does pay off in the end though!
Crab Stuffed Squash Blossoms
1lb Crab claw meat
½ bunches chives (finely chopped)
½ bunches parsley (finely chopped)
1 lemon, zested and juiced
¼ C. fresh cream
6-8 squash blossoms
1 batch of tempura batter (recipe follows)
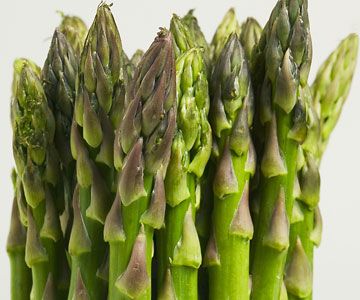
1 asparagus salad with lemon vinaigrette (recipe follows)
1 batch of lemon sabayon (recipe follows)
Combine crab meat, chives, parsley, lemon and cream in a large bowl. Mix into a paste-like consistency. Place into a piping bag and pipe into cleaned and prepared blossoms.
Caution: Do not overfill blossoms. Fill to about ¾ way full.
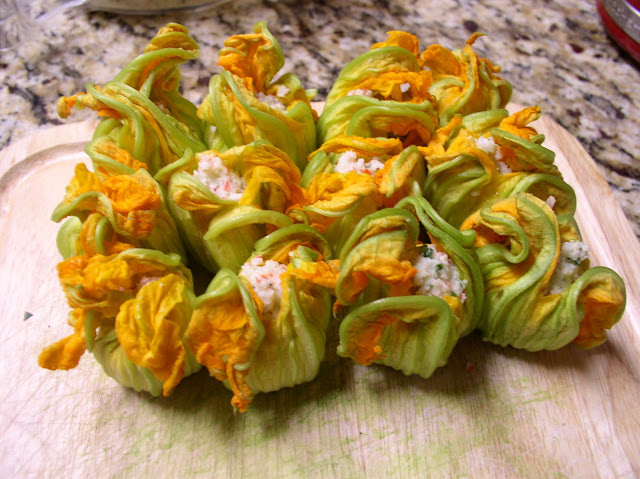
To prepare the Blossoms:
Gently but thoroughly rinse the blossoms. With a small spoon, remove the stamens, then give another quick rinse.
Tempura Batter:
1C. rice flour
1C. all-purpose flour
2 Tsp. salt
2 eggs
1 ½ C. soda water
Combine both kinds of flour, eggs, salt in a bowl. Slowly add the soda water while mixing the ingredients together until the batter has reached the consistency of pancake batter: slightly runny, will run in thin ribbons off a wooden spoon.
Note: Only use enough soda water to create the desired consistency of the batter.
Carefully coat each squash blossom evenly with the tempura batter. Fry each tempura battered blossom to a golden brown. You want the oil in the pan to cover the blossom. This will ensure even frying and that lovely golden brown color!
Shaved Asparagus Salad with Lemon Vinaigrette:
1 bunch of asparagus
4 lemons, juiced
1 C. extra virgin olive oil
2 shallots, diced
1 pinch, salt and pepper to taste
Combine the lemon juice, olive oil, shallots, salt, and pepper in a small bowl. Shave the asparagus with a peeler. Coat shaved asparagus with the lemon vinaigrette mixture.
Lemon Sabayon:
4 lemons, juiced
8 egg yolks
2 Tbsp. white wine
1/2 bunch(es) chives, diced
1/2 bunch(es) parsley, diced
1 pinch salt, to taste
Combine all of the ingredients above and cook over a double boiler until ribbons form.
Plating:
Spoon a generous amount of the lemon sabayon onto a plate. Place the asparagus salad on top of the sabayon sauce. Carefully arrange 1 -3 squash blossoms on top of the asparagus salad. Take a photo.
Monday, September 8, 2008
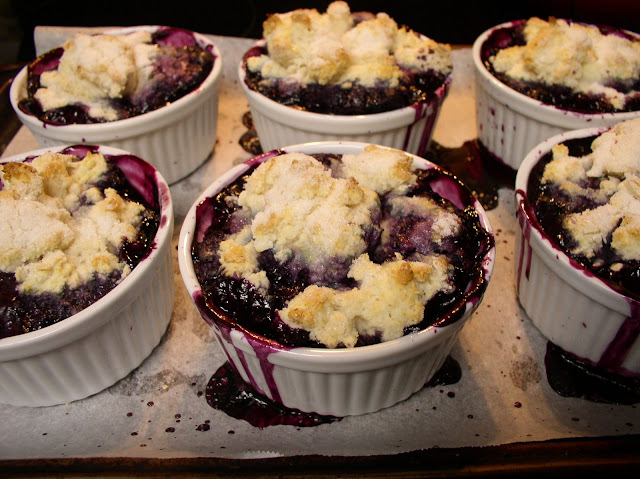
Oozy Blueberry Goodness
Cont'd - Tonight's Delight: Blueberry Cobbler (also called Blueberry Grunts)
I just love doing desserts! This is one of my favorites, good for a warm cozy sit down with a black and white (movie that is), a fluffy pillow and a big comfy couch! This dish features fresh blueberries boiled in a simple syrup, topped with fluffy biscuity goodness. It gives the perfect blend of blueberry flavor with a cozy southern appeal. Just perfect for a houseful of friends!
Blueberry Cobbler
Yeilds: Well if you ask me, hmmm, I'd say this serves about six; four if your friends like blueberries!
Blueberry Filling:
4 C. blueberries (fresh or frozen - I prefer fresh)
1 C. sugar
1/2 C. water
1 Tbsp. fresh squeezed lemon juice (about 1/2 sm. lemon)
Biscuit Topping:
2 C. All-Purpose Flour4 tsp. baking powder
3 Tbsp. Butter or Margerine
3/4 C. skim milk or buttermilk
1/2 tsp. salt
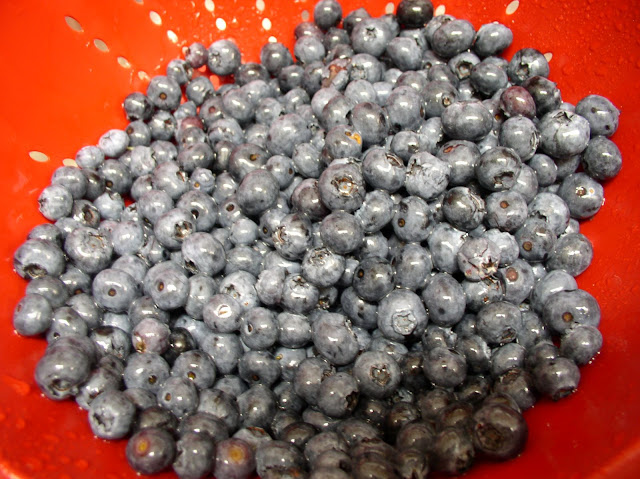
1. Prep your Blueberries. Wash your blueberries and pick out the stems. There's nothing more awful than a spoonful of blueberry yum and a mouthful of stems. Bleh! Preheat your oven to 400°.
2. The blueberry filling. Measure out your ingredients for the filling and add to a large skillet. Boil blueberry filling for 15 minutes or until the mixture has a syrup consistency.

3. Meanwhile, make the dough. Mix the flour, salt and baking powder together with a whisk. Then, using a pastry cutter (I always like using my hands, a fork does well too), cut the butter or margerine into the flour mixture. We will add the milk at the last minute, combining it with the flour/butter dough right before assembling. If the blueberries are still cooking, place the flour mixture into the refridgerator.
4. Assemble. Once the blueberry mixture has formed a syrup consistency (it will be somwhat runny), remove from heat and spoon into gratin bowls or ramekins for baking. I recommend placing these on a baking sheet to make for quick and easy handling. Also, you'll want to line your baking sheet with parchment paper. You want eating the bluberry cobbler to be the most fun part and clean up to be just as easy!
Add the milk to the flour mixture until it forms a soft biscuit dough (just enough to hold together and loose - sticky - enough to break apart. Be careful not to over mix, as that could cause your biscuits to come out tough.
Use a small cookie scoop to place small portions of the biscuit dough over the blueberry mixture in whatever fashion you please.
5. Bake. Pop these delectables in the oven for about 20 minutes. When you remove them let stand for 1 minute to cool. If you choose, you may eat from the dish or plate the cobbler by placing a plate over the cooled gratin bowl or ramekin, flip plate and ramekin until plate is right side up and gently tap the bottom of the ramekin to release cobbler. Top with a scoop of ice cream or a dollop of whipped cream. Garnish with mint and dig in!
I just love doing desserts! This is one of my favorites, good for a warm cozy sit down with a black and white (movie that is), a fluffy pillow and a big comfy couch! This dish features fresh blueberries boiled in a simple syrup, topped with fluffy biscuity goodness. It gives the perfect blend of blueberry flavor with a cozy southern appeal. Just perfect for a houseful of friends!
Blueberry Cobbler
Yeilds: Well if you ask me, hmmm, I'd say this serves about six; four if your friends like blueberries!
Blueberry Filling:
4 C. blueberries (fresh or frozen - I prefer fresh)
1 C. sugar
1/2 C. water
1 Tbsp. fresh squeezed lemon juice (about 1/2 sm. lemon)
Biscuit Topping:
2 C. All-Purpose Flour4 tsp. baking powder
3 Tbsp. Butter or Margerine
3/4 C. skim milk or buttermilk
1/2 tsp. salt
1. Prep your Blueberries. Wash your blueberries and pick out the stems. There's nothing more awful than a spoonful of blueberry yum and a mouthful of stems. Bleh! Preheat your oven to 400°.
2. The blueberry filling. Measure out your ingredients for the filling and add to a large skillet. Boil blueberry filling for 15 minutes or until the mixture has a syrup consistency.
3. Meanwhile, make the dough. Mix the flour, salt and baking powder together with a whisk. Then, using a pastry cutter (I always like using my hands, a fork does well too), cut the butter or margerine into the flour mixture. We will add the milk at the last minute, combining it with the flour/butter dough right before assembling. If the blueberries are still cooking, place the flour mixture into the refridgerator.
4. Assemble. Once the blueberry mixture has formed a syrup consistency (it will be somwhat runny), remove from heat and spoon into gratin bowls or ramekins for baking. I recommend placing these on a baking sheet to make for quick and easy handling. Also, you'll want to line your baking sheet with parchment paper. You want eating the bluberry cobbler to be the most fun part and clean up to be just as easy!
Add the milk to the flour mixture until it forms a soft biscuit dough (just enough to hold together and loose - sticky - enough to break apart. Be careful not to over mix, as that could cause your biscuits to come out tough.
Use a small cookie scoop to place small portions of the biscuit dough over the blueberry mixture in whatever fashion you please.
5. Bake. Pop these delectables in the oven for about 20 minutes. When you remove them let stand for 1 minute to cool. If you choose, you may eat from the dish or plate the cobbler by placing a plate over the cooled gratin bowl or ramekin, flip plate and ramekin until plate is right side up and gently tap the bottom of the ramekin to release cobbler. Top with a scoop of ice cream or a dollop of whipped cream. Garnish with mint and dig in!
In Pursuit of Cooking
This weekend was quite busy for me. I actually made it out to a Farmer's Market I had never been to before. Carlsbad Farmer's Market. I was disappointed because it was a smaller market and did not have a large selection as I had hoped, especially for the 30 minutes it took for me to get there. The drive there was beautiful though. It has been a while since I had been that far north. I did find a really cool drive through donut shop! (How cool is that!)

Friday, September 5, 2008
Make Way!
Ahh, the weekend is here! I've clocked out and am on my way home for some delectable treats! I'm sure my kids will be glad. On my way home I'll be stopping by the ever so popular Trader Joe's for some blueberries, chocolate chips, strawberries and cloves. Okay I know. These don't go together but they do make some awfully yummy dishes on their own!
Tonight's Delight: Blueberry Cobbler!
Tonight's Delight: Blueberry Cobbler!
Thursday, September 4, 2008
Step 4 - Repeat!
I am so ecstatic! I get to do it again! This weekend I'm going to try and make it out to at least one Farmer's Market I've never been to before. Out here it’s hard to keep up, I get distracted with the beaches and all, especially this time of year.
This time I’m setting out with a mission. I’ve got a couple of food items I haven’t worked with before and I’m going to try and make dishes with them this weekend. I’m so excited! It’s great being a good cook. You reap the benefits of your labor within minutes of finishing the job. Sweet bliss I say!
This weekend:
1. Mastering The Pie Crust
2. Blueberry Cobbler
3. Squash Blossoms
4. Artichokes
5. Sweet Oatmeal Molasses Bread
6. Swedish Ginger Cookies
Tuesday, September 2, 2008
Step 3 - Eat 'till your tummy's content!


MmMmMm...Fresh Salmon from the Market. Add side salad topped with fresh Feta, Nuts and Dried Cranberries! Yum! Braise salmon in a little Olive Oil, butter, top off with a little lemon juice and VIOLA! A succulent feast fit for a delightful tummy!
Step 2 - Follow that Food!
Poway Farmer's Market - Late August 2008
So I was able to get out of the house on time. My husband and kids were still sleeping when I left. Since I only had myself to get ready, I was done in a flash. Ah, sweet freedom! It feels good to get out in the crisp morning air. Too bad the weather didn't cooperate. I went nonetheless; hoping that the rain would die down.
I stopped off first at an olive booth where they had fresh Kalamata olives and just-pressed olive oil, un-processed. It was just straight olive oil, no added oils, preservatives, or extra processes. Sooo fantastic! The guy who owned to local company is from Greece (go figure). The way the clerk told the story, when he came to America and discovered our finest “extra virgin olive oil” and he was appalled! (How funny is that? I could just imagine him spitting it across the table!) It’s what drove him to make his own all natural olive oil. Now there’s someone with culinary drive! Ok, but seriously, I must say it’s absolutely the best oil I’ve ever tasted! They had little sample dipping oils as well. They were light but with a very pronounced, well rounded flavor! Oh, it was just delicious!
There was a slew of savory selection for my sampling delight; rows and rows of fresh fruits and veggies. An abundance of sweet, succulent pluots, peaches and prickly pears, grapes, apples, and fresh herbs lined the streets. What an awesome aroma!
Further down I found a booth with crates and crates of fresh fish. I get weary of inland market fish, but this time I decided to try it out. The lady there said her and her father go out for the morning catch and bring it in straight after and filet it. I checked out the salmon they had and to my surprise they were portioned and well cut, good strong color throughout and no odor. Each filet was cleanly packaged and ice cold, not to mention fresh, caught just this morning! Mmm! “I’ll take two please!”
So, my stormy adventure is over for now. I’ve got some fresh fish and salad for dinner so I'm rearin' to get cookin!
Subscribe to:
Posts (Atom)

